Tuesday, 30 July 2013

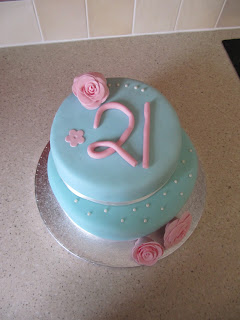
Simple 21st Birthday Cake with Roses

Hey,

So, what made up the cake?
  • Servings: around 18 but everyone is different!
  • Flavour: Victoria Sponge (plain sponge filled with jam and buttercream)
  • Size of cakes: top tier was 6 inches and bottom was 9 inches
  • Layers per tier: Top tier was simple sandwich cake, bottom tier had 3 layers of cake
  • Fondant: homemade marshmallow fondant - another blog post for that however!
  • Details: Roses and "21" handmade out of sugarpaste and sugar pearl details


A while ago I realised it was two of my friend's birthdays within a few days of each other. Now anyone who knows me, knows I use any excuse to bake so what better one than this!

I wanted to do something different. Something challenging but also something that was simple and effective!

I searched for hours, getting inspirations, working out what I could make, and make well and after drawing out many ideas, I finally came up with mine!

A simple two tiered cake, 4 handmade, sugarpaste roses and a simple "21" on the top. Sweet and simple of course!


Instructions:

Sponges:
Using a basic plain sponge or Victoria sponge mix, make and bake the sponges.
I actually made these about 3 days earlier. Once they were cooled I wrapped them in three layers of cling film so they were covered tightly and put them in the freezer. Trust me. It may sound weird but it adds moisture into the sponge and they are so much nicer. Try it and see! They take around half an hour to defrost, depending on your room temperature. Simple and so effective!

Fondant:
I spent hours trawling trying to find what was best to cover the cake in. I myself, and my friends are not big fans of standard fondant so I searched for alternative. I then discovered marshmallow fondant. It is cheap, easy to make, so much better taste and the texture is nicer. 
 My only advice is to add in a small amount of glucose, lemon and salt as it balances out the sweetness of all the icing sugar you will need. 
Another blog post on this though will follow! 
I dyed the fondant with blue food gel right at the beginning and stored it in the fridge two days before using it.

Details:
I firstly made the rose flowers out of dyed sugarpaste that can be bought from any bake shop. 
The tip is to make a cone shape out of the paste and put a toothpick through the middle of it. Then gradually biuld and shape the roses around it until it's the desired shape and size. I made these the night before so they had time to firm up and dry out.
With the remainder I shaped a "21".


  • On the day, the first thing I did was level of each cake top so they were completely flat. Then ensure the two layers of each tier are even.
  • Starting with bottom tier, create a dam on the edge of the layer so as to stop the jam spilling out. Filled with jam and then top with buttercream. Ensure not jam can escape. Put the top layer on. 
  • Then crumb coat the cake.
  • Repeat this with the top tier but keep the tiers separate for now. 
  • Leave the buttercream to firm up for about half an hour and add another layer of buttercream. Ensure this is as smooth as you can get it. Fondant will show up my bumps and lumps!
  • Now, role out the fondant so it is a couple of mm thick. Place the cake on your serving board and add the fondant and smooth and cut off the edges.
  • Insert straws (McDonalds ones are good!) into the cake, where you would like the top tier. Add around four or five. 
  • Cover the top tier in fondant too and place it on top. I put mine to the side of the top tier for a different effect.
  • Add the "21" on top as well as the small flower. I then used small edible pearl balls for detailing on the cake. 
  • Finally, add ribbon or piped buttercream to the bottom of each tier to hide any slight nicks!


And there we have it. A very simple method that creates what I believe to be an effective cake. 

I will admit it took me a lot longer than I expected but it went down so well. All worth it!

I will explain different aspects of this, such as the fondant, crumb coating and rose making in future blogs so keep an eye out!

x

Saturday, 30 March 2013

Easy Acoustic Guitar Cake

Hello! :)

So, for my first cake blog, I thought it fit to go through the first proper cake I made that was a guitar cake.

This cake was for my boyfriend, Alex, last year for his 21st (find his blog at http://alexmealinmedia.wordpress.com/ or http://alexmealinphotography.com/, he is an amazing photographer!) and it went down a treat!


I had no idea how to make this, other than looking at pictures online and managed to create this so it’s so simple but really effective. It’s what we all want as bakers isn’t it!

Whilst there are a fair few components to this cake, after reading through the recipe and instructions below, each step is fairly simple to complete!

I hired a guitar shape Wilton tin pan from a local store, which I’m sure you can get at loads of good bakery stores It didn’t come with any instructions on quantities, and the person in the shop didn’t know, so I had to guess and thankfully guessed right! Below is a picture of the tin and the picture that comes with it.


I used double quantities of a standard cake mix and made it into a chocolate and vanilla marble cake.


The icing is buttercream and for the light brown on the top of the guitar, I merely added a little bit of cocoa powder and it worked a treat! The details such as the next of the guitar were made of out shop bought fondant.

Cake Recipe: (remember that cake pans may vary and this is to be used as a guide)

Ingredients:
450g butter , softened
450g caster sugar
8 eggs

450g self-raising flour
6 tbsp milk
2 tsp vanilla extract

4 tbsp cocoa powder

Method:
Heat oven to 180C
Put all ingredients (except cocoa) into a mixing bowl and mix until smooth and all the ingredients are evenly spread out.
Divide the mixture into two bowls and add the cocoa into one of the bowls. Mix this thoroughly until it is a consistent colour.
Add in blobs of each mixture into the guitar shape pan so it is all mixed up.
I am unsure of the timings in the oven but I would say about 40 minutes but with CONSTANT checking.

Buttercream icing:

Ingredients
280g butter, softened
460 icing sugar
2-4 tbsp milk
cocoa powder

Recipe:
Cream the butter until pale and smooth
Add in the icing sugar and milk
In one bowl, put in around 2/3 of the buttercream and add small amounts of cocoa until a light brown wood colour is achieved
Into the remaining buttercream, add cocoa powder until dark brown

Once the cake was cooled, I added a crumb coating of the light brown buttercream around the whole cake. The cake was left for half an hour for the icing to start setting on the surface.


Cover the entire top of the cake in a layer of the light brown buttercream until all covered.

Then add the darker brown icing around the sides of the guitar, including the neck of the guitar.

Details

Roll black fondant until thin and cut out a circle for the sound hole in the middle of the guitar, a scratch plate and the bridge. Also cut out a strip of the fondant to run up the neck of the guitar. Finally cut out 6 small circles to the be string tuners at the top of the guitar. (Google pictures of each component if unsure, I had to to make sure I was accurate!)

Once cut out, attach these to the guitar, as can be seen in the photos.


Strings
For the strings, a basic Glace Icing mixture was used. In all honesty I cannot remember how much I used but as no colouring is needed, it is easy to mix up some more!

Once the fondant is positioned on the cake. using a piping bag and a small nozzle draw 6 even straight lines up the cake with the glace icing. Each line should end at one of the guitar tuners.

Feel free to add any finer details or writing to the cake or cake board and hey presto! You're done!!


I hope this works for you and message me if I am unclear on anything.

I’ll post a link to the Wilton page if you are interested in using the same pan.
http://www.wilton.com/idea/Acoustic-Guitar-Cake

Thanks for reading,

Niamh x

Follow me on Pinterest! http://pinterest.com/niamhdoherty/

My first blog post!


I have spent hours and hours (sleepless nights) trawling through the internet, recipe books and asking anyone who will listen, about different aspects of baking. It gets rather tedious and so I decided, why not start a blog!
I can keep everything in one place, almost like a scrapbook for myself, however everyone can read it!
I want to post little tricks I pick up along the way, posting photos, videos and recipes of little creations I make and also keeping a log of things I would like to do in the future.
I really am starting out in this vast baking world and anything I post is merely what I like, think that works and enjoy but I hope to improve along the way and hope you can join me on this journey!
Join me on Pinterest for a whole host of ideas for everything from cakes, to dinner recipes to crafts and DIY projects!

Niamh x